
🚀 Quick Start
Goal: Get the protocol running in your project in under 3 minutes.
Does this sound familiar?
You opened a chat with your AI assistant to fix a bug. An hour later, it rewrote half your codebase. You're not sure if it's better or worse. You merge it anyway.
That's the problem this protocol solves.
Step 1 — Install (30 seconds)
Run this in your project root. No setup, no config files to create manually:
npx github:wangjiajiajohn/The-Architect-ProtocolYou'll see:
━━━━━━━━━━━━━━━━━━━━━━━━━━━━━━━━━━━━━━━━━━━━━━━━━━
  🏛  The Architect's Protocol  v2.0
━━━━━━━━━━━━━━━━━━━━━━━━━━━━━━━━━━━━━━━━━━━━━━━━━━

  ↓ .cursor/rules/100-core-instructions.mdc        ✓
  ↓ .cursor/rules/200-research-gate.mdc            ✓
  ↓ .cursor/rules/300-planning-gate.mdc            ✓
  ↓ .cursor/rules/400-execution-iron-lock.mdc      ✓
  ↓ .cursor/rules/500-verification-gate.mdc        ✓
  ↓ templates/research_summary_template.md         ✓
  ↓ PROMPTS.md                                     ✓

  14 files installed · All OK ✅
TIP
Manually copy .mdc files? That works too — copy everything in .cursor/rules/ to your project.
Step 2 — Your First Task (2 minutes)
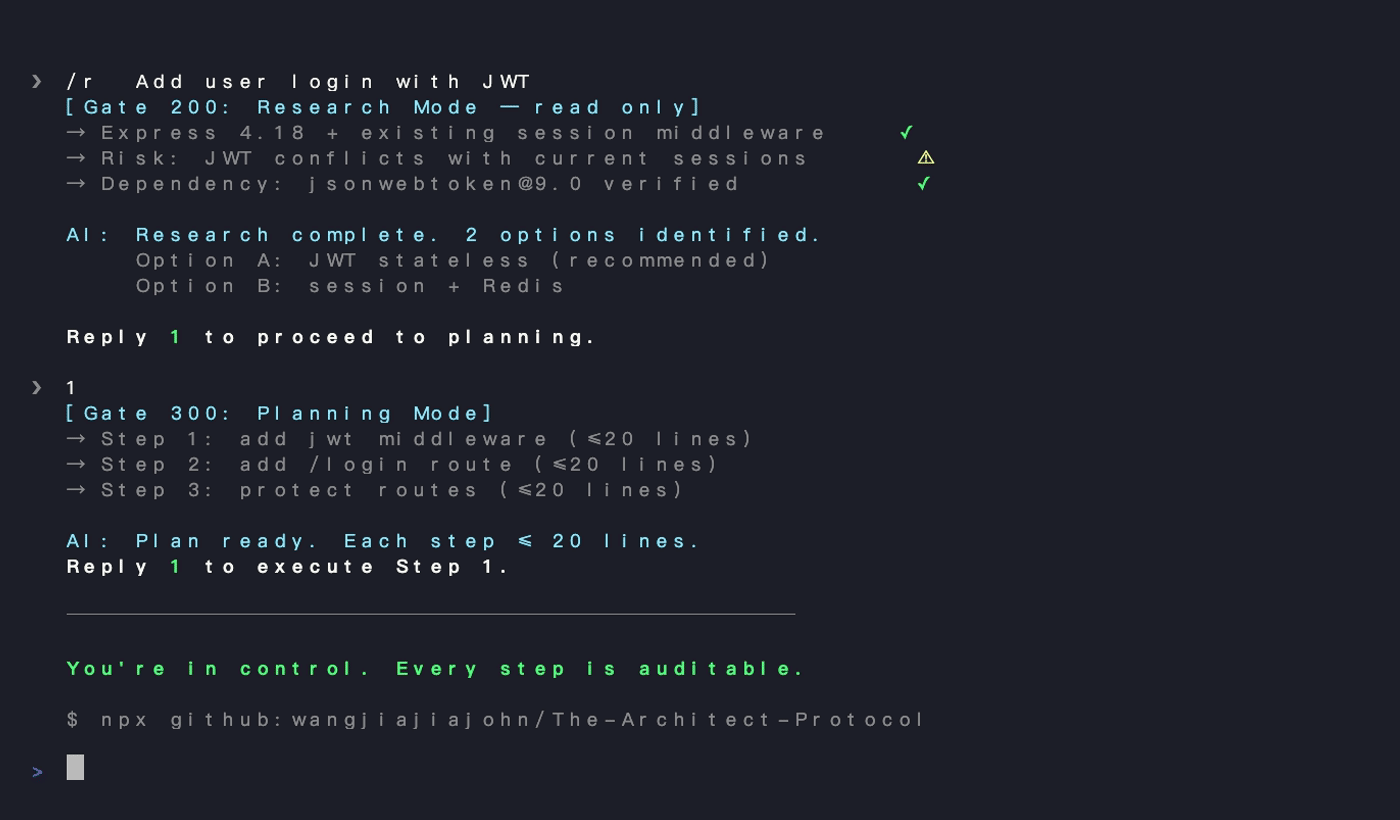
Open Cursor. Pick any feature you were about to start. Instead of typing your request directly, type:
/r I need to add user login with JWT tokensWatch what happens:
- The AI asks clarifying questions instead of immediately generating code
- It produces a
research_summary.md— a scoped analysis of your existing codebase - It identifies risks before writing a single line
When it finishes, you'll see output like:
## Research Summary — JWT Login

### Existing auth patterns found:
- middleware/auth.js (line 23): session-based, needs replacement
- models/User.js (line 45): no password hash field yet

### Risks flagged:
1. Token expiry not handled in frontend interceptor
2. Refresh token storage: localStorage vs httpOnly cookie (decision needed)

### Recommended approach: [...]

Awaiting your review. Reply `1` to proceed to planning.
This is the key moment. You just saw a research-first AI — not a code-first one.
Step 3 — The Audit Loop (45 seconds to understand)
After you reply 1, type /p to plan, then /e to execute. The pattern is:
/r → read & confirm → 1
/p → review plan  → 1
/e → review diff  → 1
/v → verify build → done
Each 1 is a physical gate. The AI cannot proceed without it.
IMPORTANT
The first time you reply 1 and the AI executes exactly what was planned — no more, no less — is when it clicks. Most users describe it as: "I finally feel like I'm in control."
What you now have
your-project/
├── .cursor/
│   └── rules/
│       ├── 100-core-instructions.mdc    ← AI identity & rules
│       ├── 200-research-gate.mdc        ← /r gate (research lock)
│       ├── 300-planning-gate.mdc        ← /p gate (plan lock)
│       ├── 400-execution-iron-lock.mdc  ← /e gate (atomic execution)
│       └── 500-verification-gate.mdc    ← /v gate (quality check)
├── templates/
│   ├── research_summary_template.md
│   ├── implementation_plan_template.md
│   └── adr_template.md
└── PROMPTS.md                           ← For Claude / ChatGPT / Copilot
Not using Cursor?
If you use Claude, ChatGPT, or GitHub Copilot, open PROMPTS.md — it has the complete system prompt for each tool. Paste it as your system instructions and you get the same gate behavior.
[!SUCCESS] That's it. You've transformed your AI from an impulsive code generator into a precision engineering tool. Next: read the Full SOP to understand why each gate exists, or jump into Real-World Cases to see it in action.